
CloudStack - Create Windows 11 VM instance on Ubuntu 22.04
—–IMPORTANT NOTICE: There are some changes after this original post——
Please refer to CloudStack - Create Windows 11 VM instance on Ubuntu (Update 2025.03)
The article CloudStack – VM with vTPM and Secure boot UEFI introduces how to create a VM with vTPM and UEFI on CentOS x host using Apache CloudStack. However, it does not work on Ubuntu releases [2]. This blog introduces how to create Window 11 VMs step by step.
If you use RHEL, RockyLinux or AlmaLinux, please refer to CloudStack - Create Windows 11 VM instance on RHEL/RockyLinux/AlmaLinux
Minimum System Requirements of Windows 11
Windows 11 has Minimum System Requirements and your PC, which includes
- RAM: 4 GB.
- Storage: 64 GB or larger storage device. For test purpose, 20 GB is enoug.
- System Firmware: UEFI (for Unified Extensible Firmware Interface, a modern version of the PC BIOS) and Secure Boot capable
- TPM: Trusted Platform Module (TPM) version 2.0. Refer to What is TPM?
Prerequisites
Apache CloudStack™ is an open-source software system designed to deploy and manage large networks of virtual machines, as a highly available, highly scalable Infrastructure as a Service (IaaS) cloud computing platform.
Firstly, you need to have a CloudStack environment running. Please refer to Apache CloudStack’s Documentation. Some CloudStack configurations are required
-
Create a Service Offering with at least 4GB memory. Please refer to Creating a New Compute Offering
-
Create an Isolated network. Please refer to Configure Guest Traffic in an Advanced Zone.
-
Create egress rule to allow outgoing traffic so the VM instances can access the Internet, please refer to Egress Firewall Rules in an Advanced Zone.
Step 1: Configure UEFI and TPM on Ubuntu host
Ubuntu hosts need to be installed, configured and added to Apache CloudStack. Some packages need to be installed to support UEFI and TPM, as well as CloudStack. See below
# dpkg -l | egrep "tpm|ovmf|cloudstack"
ii  cloudstack-agent                      4.19.0.0                                all          CloudStack agent
ii  cloudstack-common                     4.19.0.0                                all          A common package which contains files which are shared by several CloudStack packages
ii  libtpms0:amd64                        0.9.3-0ubuntu1.22.04.1                  amd64        TPM emulation library
ii  libtss2-tcti-swtpm0:amd64             3.2.0-1ubuntu1                          amd64        TPM2 Software stack library - TSS and TCTI libraries
ii  ovmf                                  2022.02-3ubuntu0.22.04.1                all          UEFI firmware for 64-bit x86 virtual machines
ii  swtpm                                 0.6.3-0ubuntu3.2                        amd64        Libtpms-based TPM emulator
ii  swtpm-tools                           0.6.3-0ubuntu3.2                        amd64        Tools for the TPM emulator
ii  tpm-udev                              0.6                                     all          udev rules for TPM modules
The UEFI firmware files can be found at /usr/share/OVMF/. Please refer to UEFI boot and different OVMF firmware files
# ls -l /usr/share/OVMF/
total 12816
-rw-r--r-- 1 root root 3653632 Sep 13  2022 OVMF_CODE_4M.fd
lrwxrwxrwx 1 root root      23 Sep 13  2022 OVMF_CODE_4M.ms.fd -> OVMF_CODE_4M.secboot.fd
-rw-r--r-- 1 root root 3653632 Sep 13  2022 OVMF_CODE_4M.secboot.fd
lrwxrwxrwx 1 root root      23 Sep 13  2022 OVMF_CODE_4M.snakeoil.fd -> OVMF_CODE_4M.secboot.fd
-rw-r--r-- 1 root root 1966080 Sep 13  2022 OVMF_CODE.fd
lrwxrwxrwx 1 root root      20 Sep 13  2022 OVMF_CODE.ms.fd -> OVMF_CODE.secboot.fd
-rw-r--r-- 1 root root 1966080 Sep 13  2022 OVMF_CODE.secboot.fd
-rw-r--r-- 1 root root  540672 Sep 13  2022 OVMF_VARS_4M.fd
-rw-r--r-- 1 root root  540672 Sep 13  2022 OVMF_VARS_4M.ms.fd
-rw-r--r-- 1 root root  540672 Sep 13  2022 OVMF_VARS_4M.snakeoil.fd
-rw-r--r-- 1 root root  131072 Sep 13  2022 OVMF_VARS.fd
-rw-r--r-- 1 root root  131072 Sep 13  2022 OVMF_VARS.ms.fd
Create a file /etc/cloudstack/agent/uefi.properties with content as below
guest.nvram.template.secure=/usr/share/OVMF/OVMF_VARS_4M.ms.fd
guest.nvram.template.legacy=/usr/share/OVMF/OVMF_VARS_4M.fd
guest.nvram.path=/var/lib/libvirt/qemu/nvram/
guest.loader.secure=/usr/share/OVMF/OVMF_CODE_4M.secboot.fd
guest.loader.legacy=/usr/share/OVMF/OVMF_CODE_4M.fd
Restarting cloudstack-agent to make it effective
# systemctl restart cloudstack-agent
Now Check the host details by cmk (aka cloudmonkey) on the CloudStack management server. The host should have the details "host.uefi.enable": "true" which indicate the host supports UEFI.
# cmk list hosts type=Routing | jq -r '.host[].details'
{
  "Host.OS": "Ubuntu",
  "Host.OS.Kernel.Version": "5.15.0-35-generic",
  "Host.OS.Version": "22.04",
  "com.cloud.network.Networks.RouterPrivateIpStrategy": "HostLocal",
  "host.uefi.enable": "true",
  "secured": "true"
}
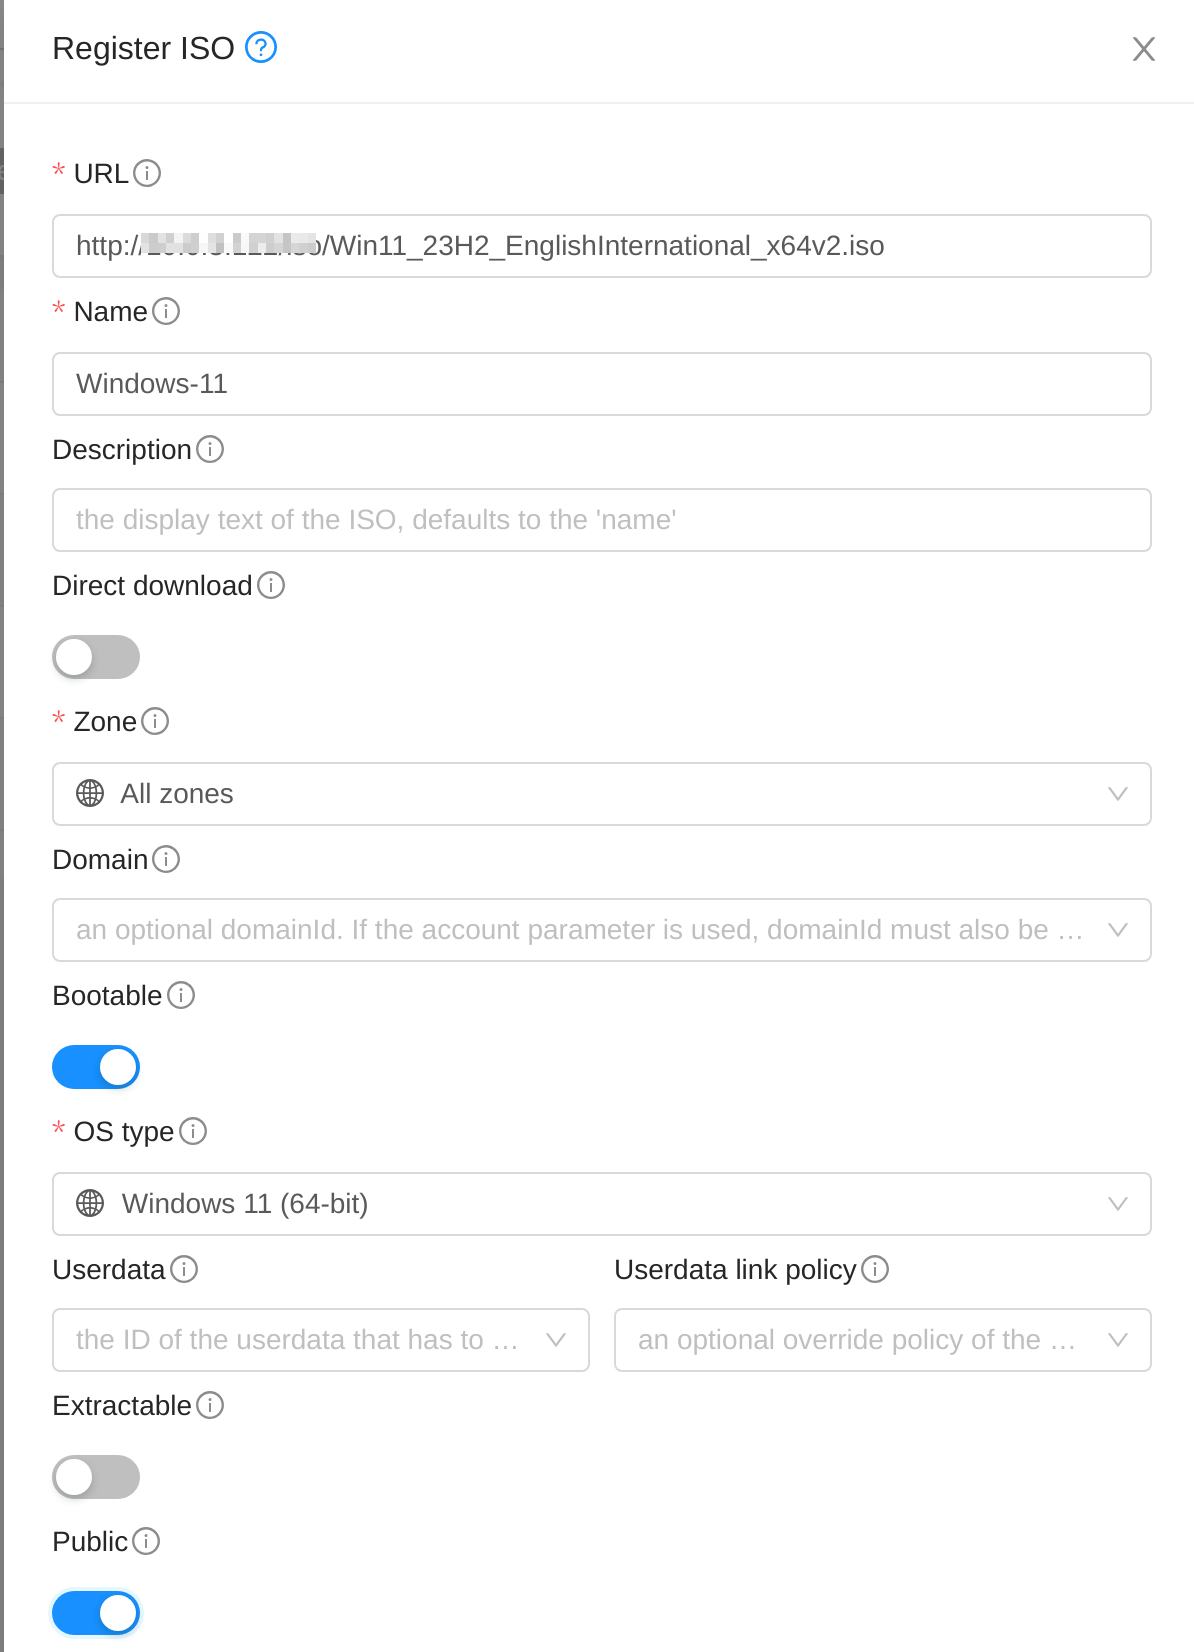
Step 2: Register ISO for Windows 11
The Windows 11 ISO can be downloaded for free at Download Windows 11
When it is ready, register the ISO on CloudStack UI or upload ISO from local
[
Step 3: Deploy Windows 11 VM instance
Go to Compute -> Instances, click “Add Instance”.
- In the “Template/ISO” section, click “ISOs” tab and choose the Windows 11 ISO.
- In the “Compute offering” section, choose a service offering with at least 4GB memory.
- In the “Disk size” section, choose a disk offering with at least 20GB disk or choose the “Custom” offering and specify a disk size (In GB).
- In the “Networks” section, choose the isolated network created, or a shared network.
- In the “Details” section, type a VM name and uncheck
Start Instance.
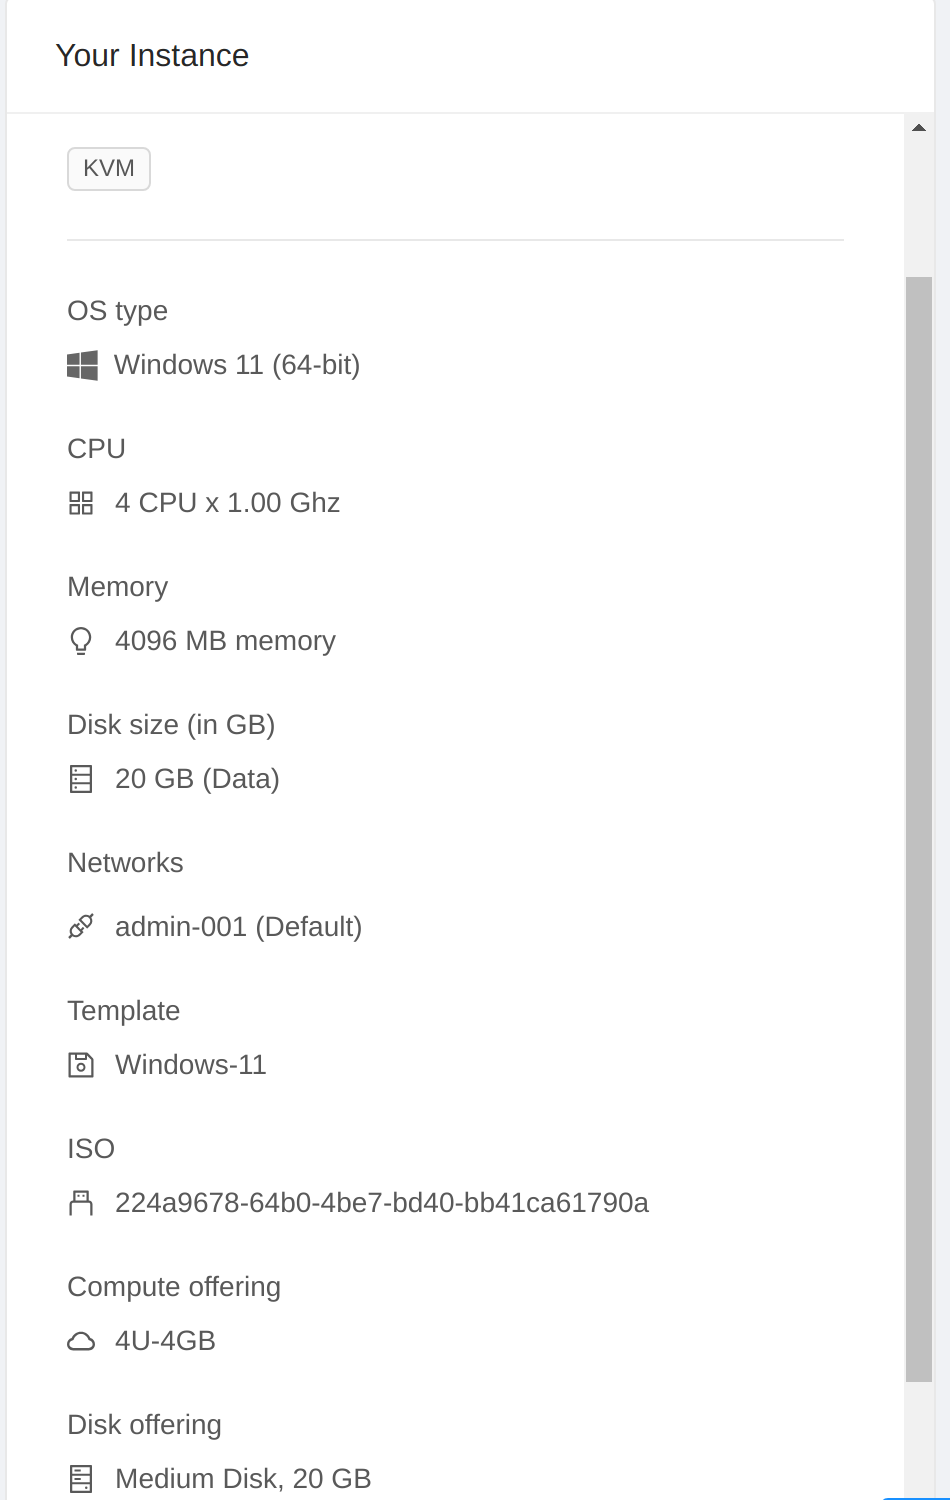
Below is the overview of my Windows VM.
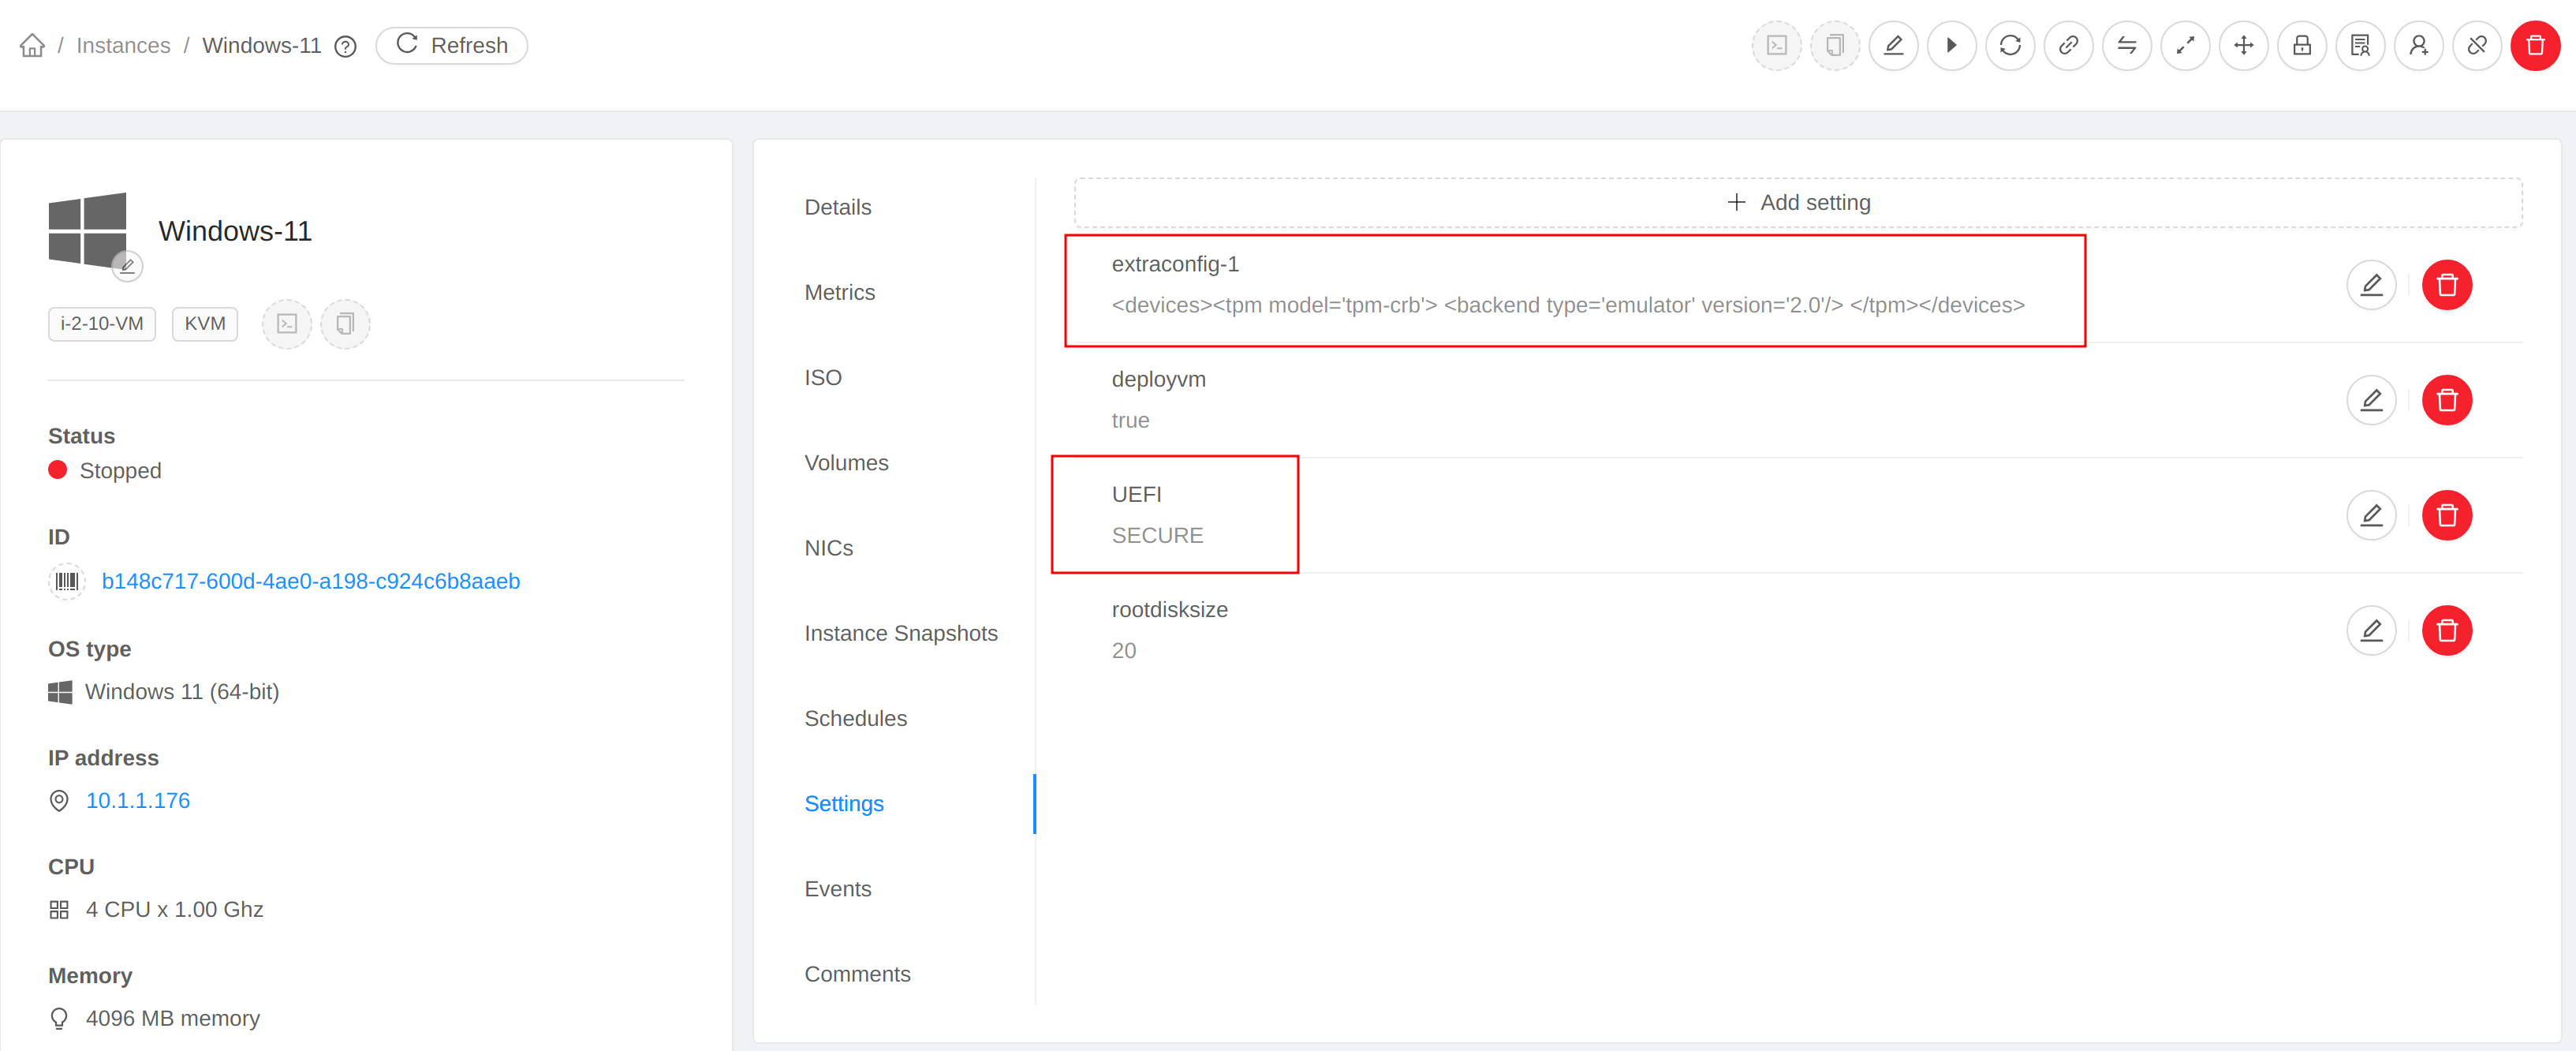
Now go the “Settings” tab of VM details page, add two VM settings:
| Name | Value | Note |
|---|---|---|
UEFI |
SECURE |
Enables UEFI and SECURE mode |
extraconfig-1 |
<devices><tpm model='tpm-crb'> <backend type='emulator' version='2.0'/> </tpm></devices> |
Adds the TPM device |
Step 4: Install Windows 11
Start the VM instance, and open the console of the VM instance. The VM instance will be booted into UEFI Interactive Shell. You can refer to How to Use UEFI Interactive Shell and Its Common Commands.
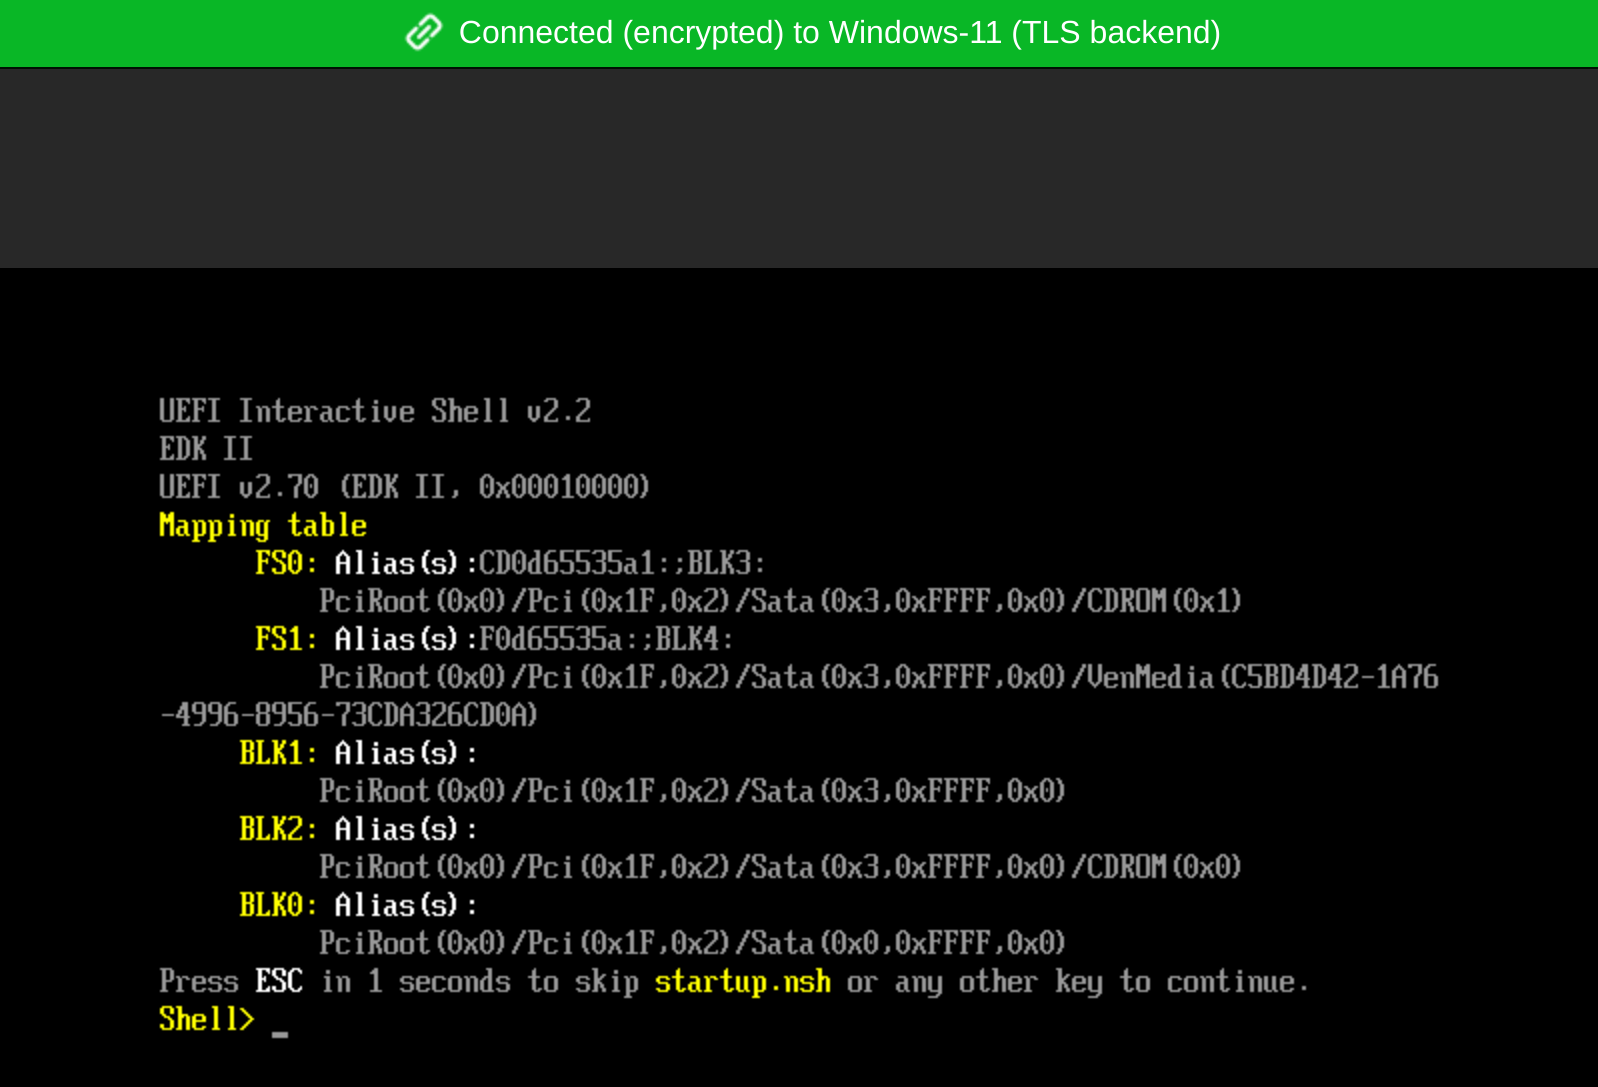
Enter “exit” , and click “Continue” on the next page.
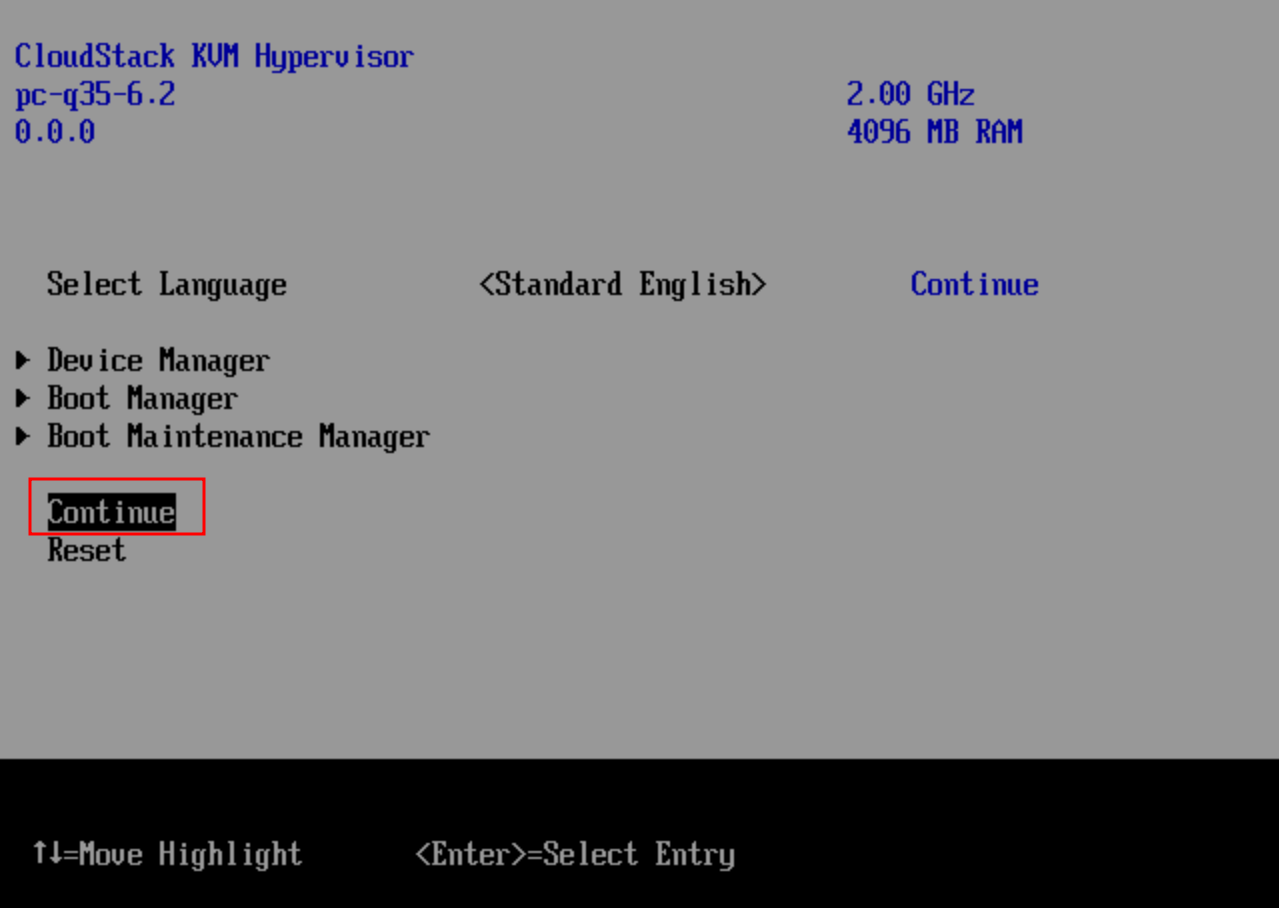
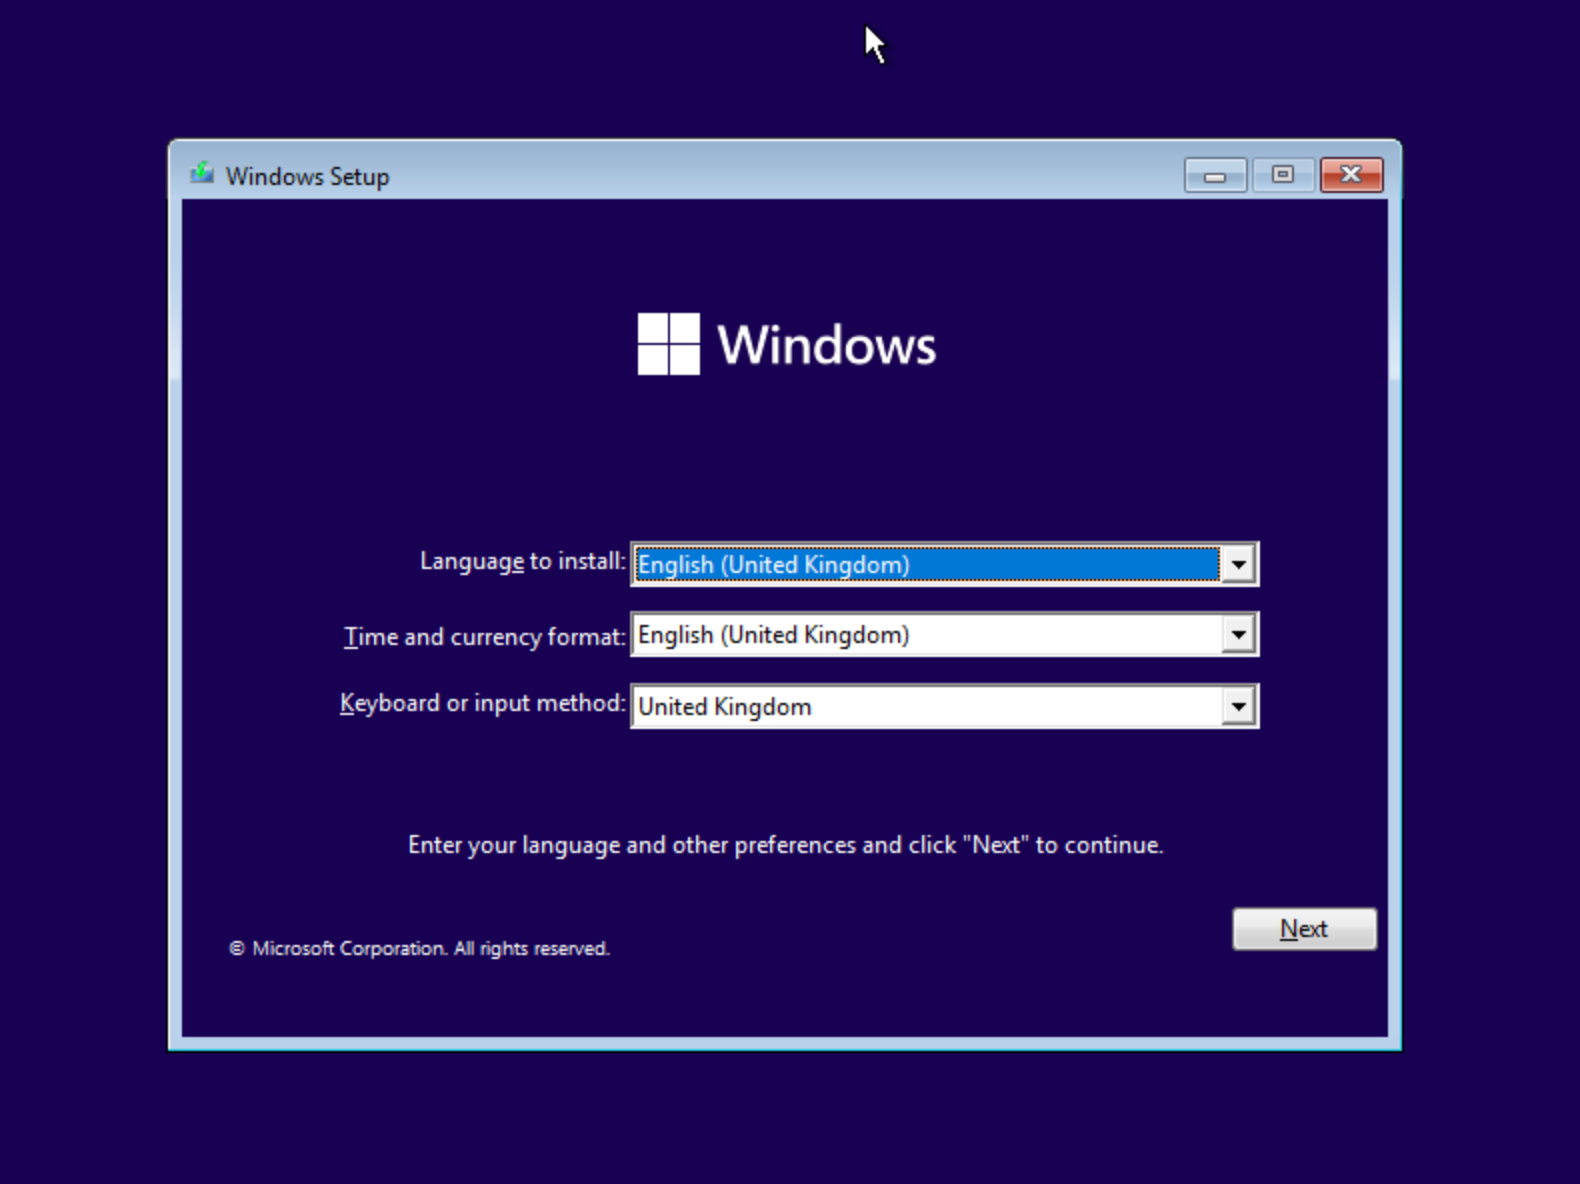
The press any key to boot from the installation ISO. The Windows setup wizard is displayed on the screen.
Step 5: Verification
Log into the Ubuntu host, run virsh dumpxml --security-info <vm instance name> to get the XML definition. We can find the following configuration for UEFI:
  <os>
    <type arch='x86_64' machine='pc-q35-6.2'>hvm</type>
    <loader readonly='yes' secure='yes' type='pflash'>/usr/share/OVMF/OVMF_CODE_4M.secboot.fd</loader>
    <nvram template='/usr/share/OVMF/OVMF_VARS_4M.ms.fd'>/var/lib/libvirt/qemu/nvram/b148c717-600d-4ae0-a198-c924c6b8aaeb.fd</nvram>
    <boot dev='cdrom'/>
    <boot dev='hd'/>
    <smbios mode='sysinfo'/>
  </os>
For TPM device:
    <tpm model='tpm-crb'>
      <backend type='emulator' version='2.0'/>
      <alias name='tpm0'/>
    </tpm>
When Windows 11 OS is installed successfully,
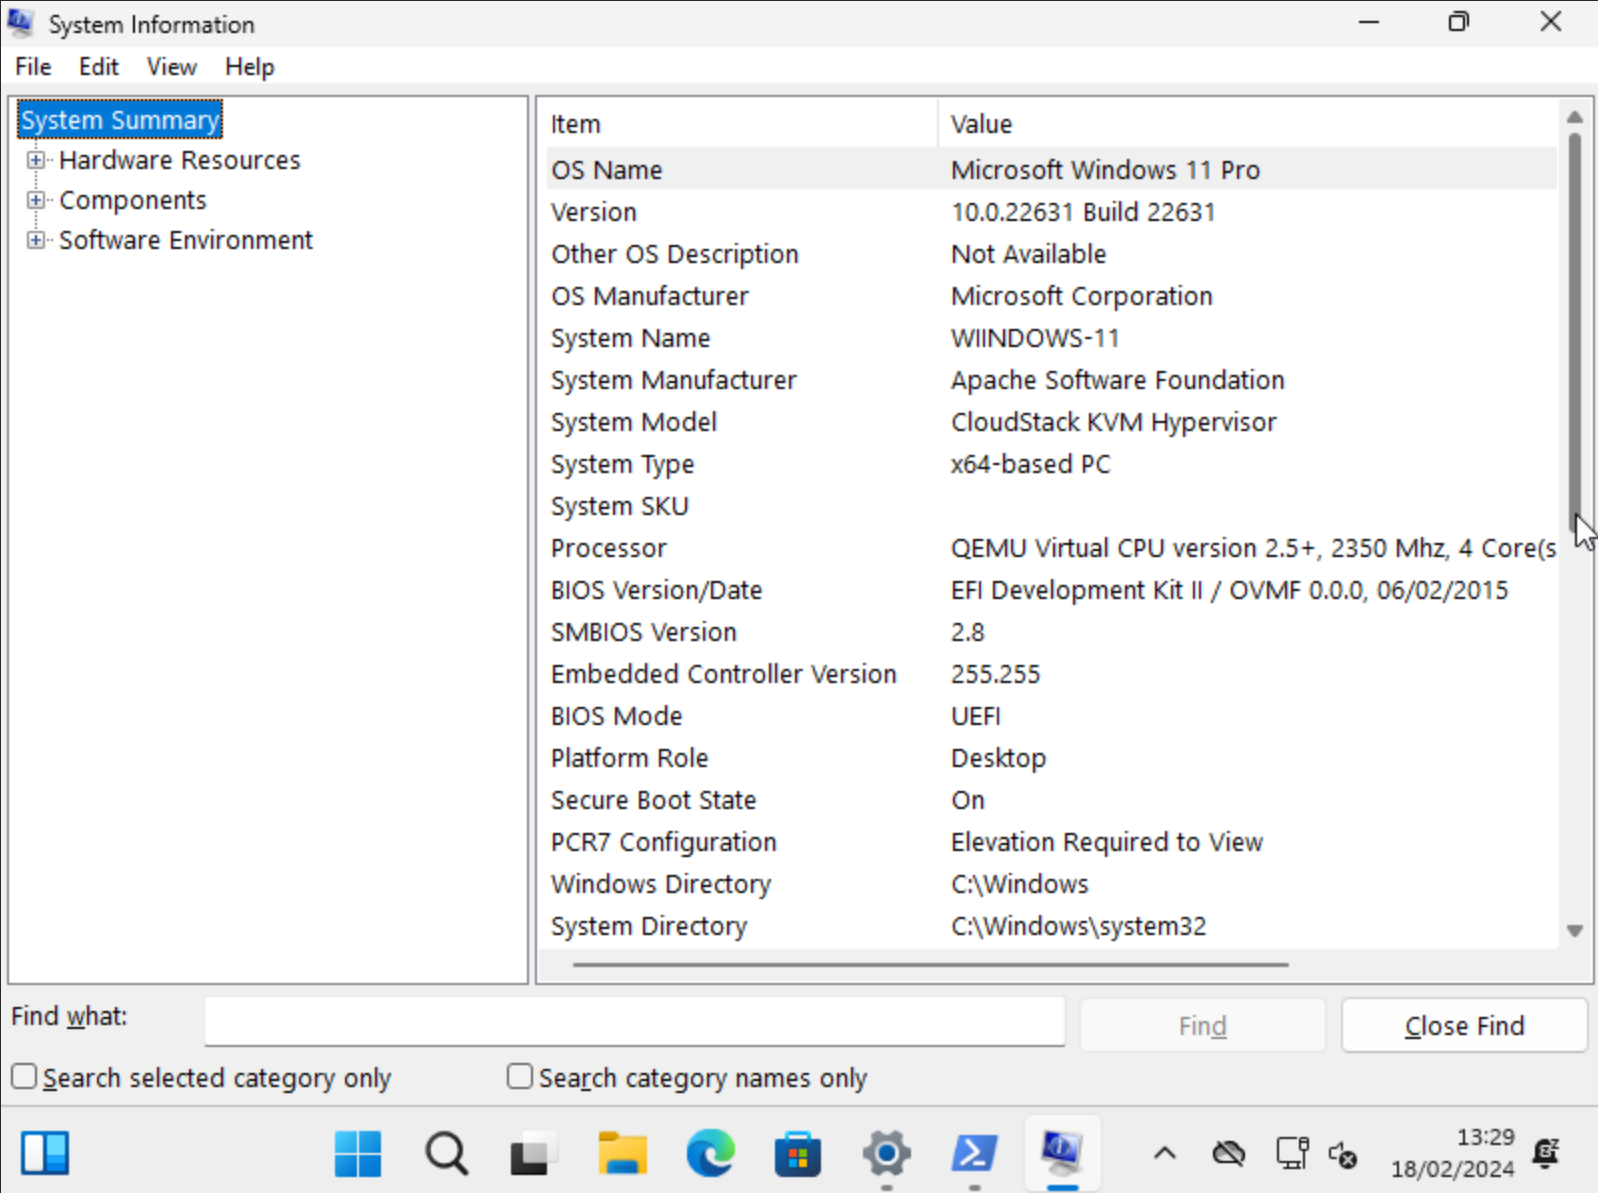
Everything looks good !
References
- [1] https://lab.piszki.pl/cloudstack-vm-with-vtpm-and-secure-boot-uefi/
- [2] https://github.com/apache/cloudstack/issues/8469